
Transforming your deck this spring can be exciting, but avoiding common staining mistakes is essential to ensure a professional and lasting finish. Whether you’re a homeowner looking to revamp your outdoor space or a business owner maintaining a commercial property, avoiding these staining pitfalls is crucial for a successful deck transformation. Here, we’ll explore some critical mistakes to avoid so you can achieve a beautifully stained deck that enhances your outdoor area’s aesthetic appeal and longevity.
Preparation Is Key
Before staining your deck, starting with a clean surface free from dirt, debris, or mildew is crucial. Inspect the deck for loose boards or protruding nails that require fixing before applying the stain. Cover surrounding plants and areas you want to protect from splatters or spills during staining. When planning the staining day, consider the weather forecast and opt for a day with moderate temperature and low humidity for optimal staining conditions. This thoughtful preparation will set the stage for a successful deck transformation while avoiding common staining mistakes.
Cleaning the Surface Thoroughly
To transform your deck this spring, begin sweeping the entire deck to remove any leaves, twigs, or other debris that may have gathered. Next, use a suitable cleaner and a stiff brush to remove mold, mildew, or old stains from the wood surface. After scrubbing, rinse the deck thoroughly with a garden hose to remove all traces of the cleaning solution and loosen debris. Allowing sufficient time for the deck to dry completely is essential before sanding and staining. This thorough preparation will lay the foundation for a successful deck transformation and help you avoid common staining mistakes.
Sanding and Repairing Any Damaged Areas
Carefully examining the entire deck surface is essential to identify any signs of rot, cracks, or splintered wood that need attention. Utilizing a sander can smooth out rough spots and eliminate any remaining traces of old stain or sealant, ensuring a clean and even base for the new stain. If there are damaged boards or cracks, it’s essential to replace the boards and fill in the cracks with suitable wood filler before proceeding with the staining process. Once all necessary repairs are complete, sanding all surfaces evenly will create a uniform base for applying the new stain, resulting in a beautifully transformed deck.
Choosing the Right Stain
Before choosing a stain for your deck, it’s essential to consider the wood species, as different types of wood may require different stain formulations. Think about the opacity of the stain – whether solid, semi-transparent, or transparent – based on the level of coverage and visibility you desire. It would be best to evaluate whether a water- or oil-based stain would suit your deck, considering drying time, durability, and environmental impact factors. Ensure that the chosen stain color complements the overall aesthetic of your home and outdoor space to achieve a cohesive look.
Understanding Different Stain Types
When choosing a stain for your deck, take the time to acquaint yourself with different types to avoid potential staining mistakes. Explore oil-based stains that offer durability and richness, but remember they require longer drying times. On the other hand, water-based stains provide quick drying times, low VOC emissions, and easy cleanup. You can also familiarize yourself with semi-transparent stains, which enhance the natural wood grain and offer moderate UV protection. Learn about solid stains designed to provide extensive coverage, UV protection, and a wide range of color choices suitable for heavily weathered or older decks. This knowledge will help you make an informed decision and achieve a beautifully transformed deck this spring.
Considering the Deck’s Exposure to Sun and Weather
When planning to stain your deck, assessing how much direct sunlight it receives daily is crucial, as excessive sun exposure can lead to fading and deterioration of specific stain colors over time. Considering the local climate conditions in Barrie and Simcoe County is essential when selecting a stain that offers adequate resistance to rain, snow, humidity, and temperature fluctuations. Take into account any nearby trees or foliage that may contribute to debris accumulation or shade patterns affecting the deck’s exposure to weather elements, and factor in any existing protective features like pergolas or awnings that could influence the level of direct exposure to sun and weather on your deck surface. These factors will help you make an informed decision and avoid staining mistakes, ensuring a successful deck transformation.
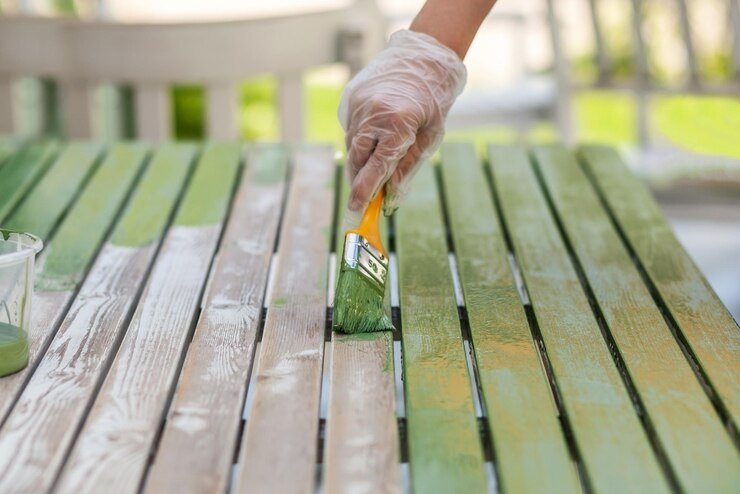
Application Techniques
To ensure even coverage and reach all deck areas, apply the stain using a brush, roller, or sprayer. Working in small sections is crucial to achieve uniform application and prevent the stain from drying before spreading it evenly. Consider using a staining pad for more precision, especially in hard-to-reach areas or intricate woodwork. Apply a second coat to achieve your deck’s desired color and protection if necessary. These application techniques can avoid common staining mistakes and achieve a beautifully transformed deck this spring.
Using the Right Tools for Even Coverage
When applying stain to your deck, choosing the right tools can significantly affect the outcome. Opt for brushes with natural bristles for oil-based stains to achieve smooth and even application, while synthetic bristles are more suitable for water-based stains. Consider using a paint roller with a medium nap for flat surfaces to ensure efficient coverage and an airless sprayer for larger deck areas, adjusting the pressure to control the flow. A staining pad with an extension pole can help you reach between deck boards and maintain consistent application for a beautifully transformed deck this spring. Paying attention to these application techniques can help you avoid staining mistakes and achieve professional results.
Avoiding Overlapping and Dripping
Starting the deck staining process from one end of the deck and working towards an exit point will help you avoid stepping on freshly stained areas, ensuring a seamless finish. Maintaining a wet edge while blending each new section into the previously stained area is crucial to prevent visible overlap marks and achieve uniform coverage. Immediately remove any excess stain to prevent dripping and pooling, especially on vertical surfaces like railings or posts. Checking the weather forecast is also essential to ensure no rain is expected within at least 24 hours after staining, thus avoiding wash-off or dilution of the stain for a successful deck transformation.